Is your Bantam in need of a new heart?

$4,000 is a lot of money, there is no question about that.  So when confronted with a price tag calling for that much money, it’s best to be an intelligent buyer.  This engine has been listed for auction by a seller who has been listing a lot of Bantam and Austin parts over the past few months.  This engine is probably one of the greatest finds in the collection because of the potential it may offer.

I don’t have an awful lot to say about this engine, as people have their different views on rebuilt engines and engines that are rebuilt but lay dormant.  While some may recommend tearing it down to go through the engine, others may be willing to run it as is.  If you’re willing to accept this as being equal to a modern rebuild where all of the parts have been wet magnafluxed, rebabitted, and assembled with the highest quality materials; this could be a bargain.

In theory, I believe it should be torn down and inspected before being run; but then again I am usually a “get the ether and a jumper pack” kind of guy because I just want to hear the engine come to life (which is a terrible idea).  I’ll let you be the judge, but I’ll give you a few things to consider:

  1. In the 1980’s, parts may have not been magnafluxed or at least not wet magnafluxed (which is a far superior method of crack detection).
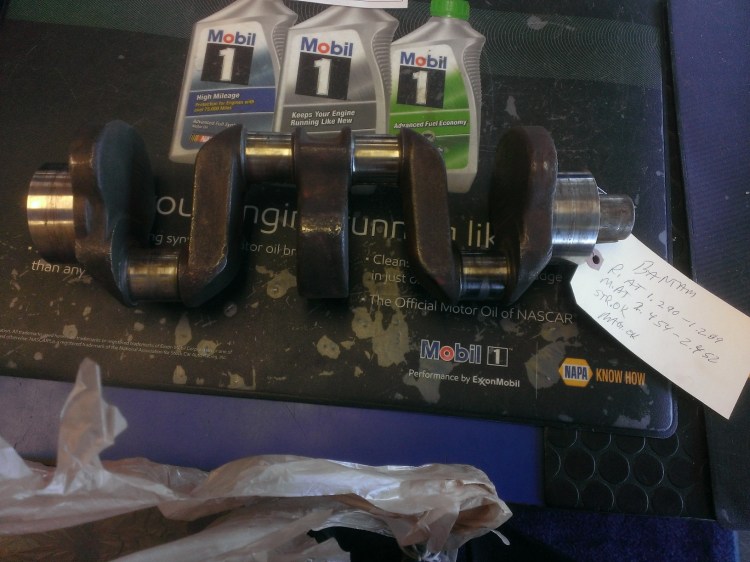
  2. Original Bantam rod bolts are notoriously weak, we do not see a bill of materials indicating what was used.
  3. New main bearings were cited in the ad. Does that mean the rebuilder used NOS front and rear bearing retainers with their original poured babbit, were original retainers rebabbitted, or were some sort of inserts used?
  4. We don’t know if the new rods were the NOS 38 style rods which were available with original babbit or something else.  In any event, how were they modified to accommodate the undersized crankshaft?
  5. The engine does not appear to have any of its openings sealed.
Screenshot (74)

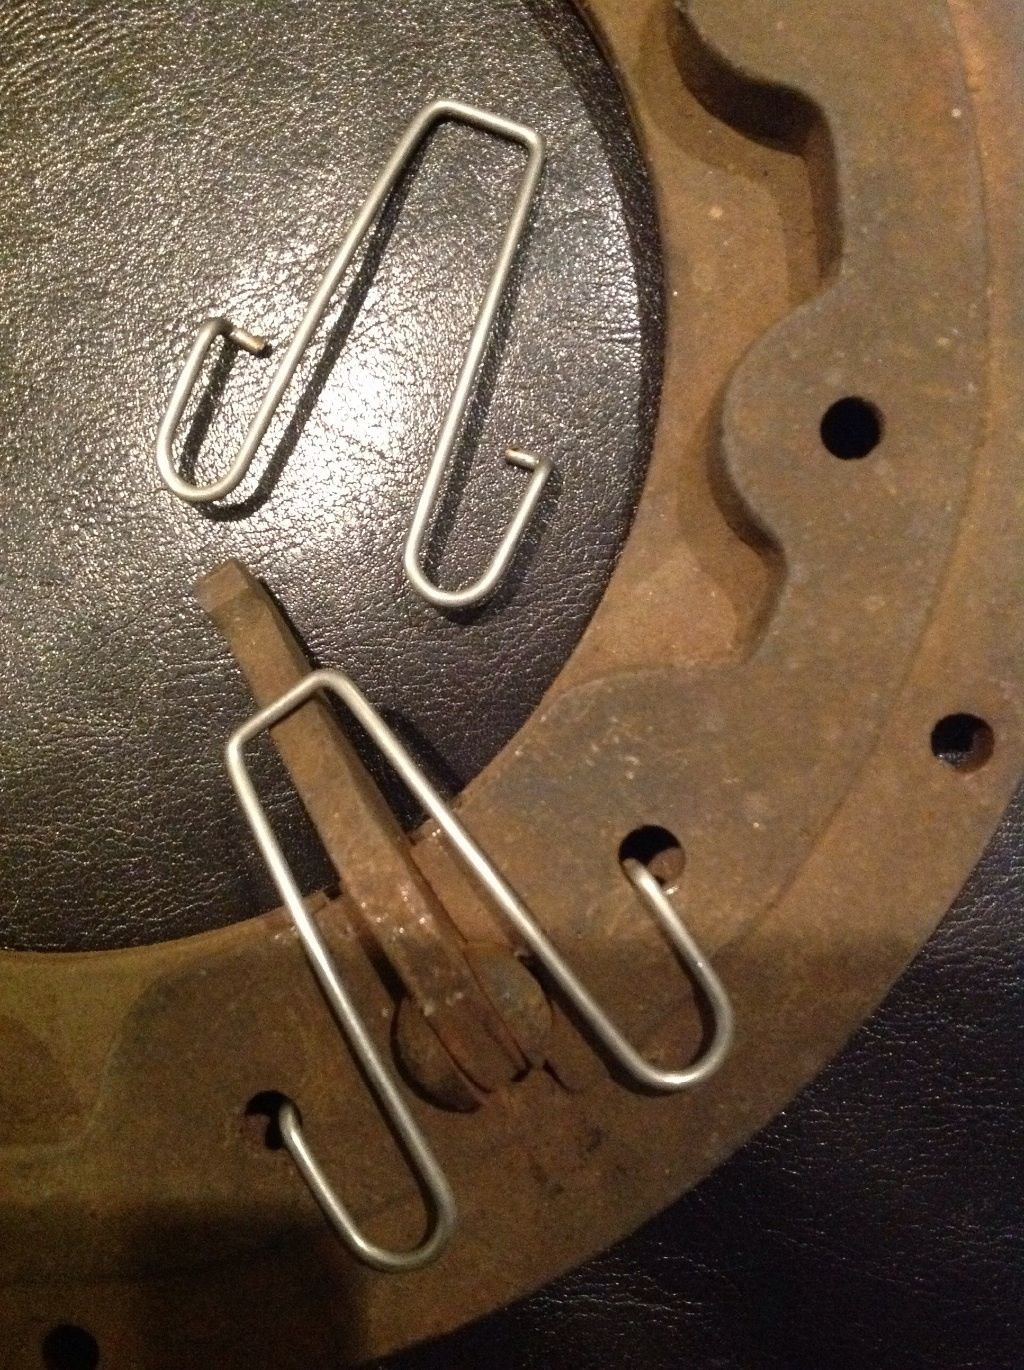
This is what a NEW or never run rebuilt Brennan IMP looked like in the exhaust ports after laying dormant for years.


This engine could be great or it could be a very expensive (but pretty) collection of parts.

What are your thoughts? (A few people have already chimed in and have inspired some additions to this post).


Click here to see the American Bantam Engine


Advertisement

Farewell Brennan Standard Motors

Far west of here, in Scottsdale Arizona about six Bantams are waiting for their turn to shine at the Barrett Jackson Auction.  Combined with the three Bantams which went on the block in the previous two weeks, these cars could have a far reaching impact on the Bantam market or at least serve as an indication of the health of such market.  I wanted to deliver a blog post today about these cars, however, something else has preempted that post.

brennan-motor-complex-syracuse

As some of you may know, I am a big fan of Brennan Standard Gasoline Motors.  Until its closure in 1972 they were one of the preeminent gasoline engine manufacturers in New York.  When Bantam ended production of civilian cars, they picked up the torch and carried the Bantam engine for three more decades.  Over those three decades, the 25 hp Hillmaster evolved into the 40 hp Brennan I.M.P.

So, as a New Yorker, a person who enjoys boating, and a Bantam enthusiast; I have a soft spot for Brennan engines.  I am so endeared to this company and their little I.M.P. that I am using one of their first Hillmaster conversions in my 1940 Bantam Sportsman project.  There also may be a later Brennan squirreled away for a future wooden boat build.  As an interesting aside, in one of the club newsletters, there were photos of a Bantam themed wooden boat powered by an early Brennan I.M.P.; I wish I had those photos to share with you here.

Why all of this gushing over an engine company?  This week, the Syracuse, NY government ordered the demolition of the Brennan Standard Motors factory.  You can read more about it here and here.  If you’d prefer to see a video click here.  This really shouldn’t come as a surprise given the long derelict condition of the building, it’s owner’s desire to turn it into a parking lot, the State of New York’s declaration that it may need the Brennan land to modify Rt 81, and a fire that raged at the factory this past August.

Ten years ago, it seemed that the Brennan complex may have been poised for a resurrection at the hands of an ambitious student of Architecture.  However, neither time nor the local community have really been on Brennan’s side.  There are rumors that some of Brennan’s old casting molds still exist, and I’ve been following those rumors for several years now.  It would have been nice if the Brennan buildings could have been saved, especially given the similarly derelict condition of the remaining Bantam administration building in Butler, PA.

Thank you George for bringing this to my attention.  Below is a photo from the last time I passed the Brennan complex.  The next time I drive past this building, it will be but a blank space awaiting a new future.

wp_20161110_005


A later Brennan Imp has come up for sale

Do you need an engine for your Bantam and are feeling adventurous?  Or do you have a three main engine that needs parts?

In Chepachet Rode Island, a seller on ebay has an early-ish version of the late Brennan Imp.  The cylinder block has the D-8831 casting number on it, which could directly be used in a 3 main rebuild.  If you are in need of parts for a Bantam three main engine, the bits which should directly work are: the pistons, connecting rods, distributor, starter,  cam shaft (although it may have a different profile) and valve train, valve cover, and spark plugs.  The crankshaft would work, but it would require modification at a machine shop in order to be adaptable (as per several sources including correspondence between Brennan and a Bantam enthusiast in the 1940’s).

If you’re looking for a complete and original Brennan, this looks like a nice unit.  Please note:  the intake has been modified and it is missing several parts including the shifter lever, the correct carburetor, and flywheel cover.

I’m glad to see that this engine has survived and hope that it will get into good hands.  Will those hands be yours?


Click here to see the listing: Brennan Imp

Autopsy of an American Bantam Engine: Part IV

The results are back from the machine shop, the crank is good!

WP_20160113_002

Results:

Main Journals:  Standard 2.5″  This engine:  2.454-2.452″ Undersized at:  .048″

Rod Journals:  Standard 1.312″ This engine:  1.290-1.289″   Undersized at:  .023″

Magged: OKAY

Straightness:  OKAY

The man at the machine shop recommended a polishing of the journals at most, but said the rod journals looked nice.


WP_20160113_003

Ziploc makes great bags for your crank shafts awaiting their destiny.  Just oil up the crank, place it inside, push out the air and lock it in.  You could get a little extra fancy and add one of those silica packets from a shoe box until you know exactly what you’re doing.

As for this crankshaft, I’m not quite sure what I’m going to do with it just yet.  All of the other pieces that make up the engine are inside of a large plastic bin in my garage.  So, which ever way I end up going, I at least know that this crank is supposed to be a good foundation for an engine.  Whether I gather up replacement parts to fix the cracked pieces on this one, or use it as the basis for another engine, it’ll be nice to know that the piece holding it all together is straight and strong.

After everything, I am thinking that this engine was fully rebuilt at one time and the person who did the work was very angry when the engine wouldn’t turn over all of the work.  The owner may have let it sit for a while, trying to decide what course would be best to take and finally decided to get rid of the car.  Wanting to make sure that no one could use the car easily again, the person may have taken a hammer and destroyed the parts he knew would cause this car to be out of commission indefinitely.  With the crankcase destroyed and the bell housing smashed, just sliding new parts in would have been difficult.  Destroying the gas tank with what looks to be a pick axe may have also been part of an angry seller’s plan.

Either way,  there are enough empty crank cases out there awaiting a nice crank like this, and enough cars waiting for a good engine.  The car this came from is being hot rodded by a father and son who are looking to do it properly.  So, the car is finally getting a new lease on life, and its parts may do the same for another Bantam or two out there.

Thanks for reading.


Autopsy of an American Bantam Engine: Part III

Welcome to the final installment of the disassembly.  Could the engine come apart a little more?  Yes.  In fact, the oiling system will probably need to be taken out of this engine, but everything is at a stand still until I know what condition the crankshaft and rods are in.

Remember that rear main bearing carrier I showed you a photo of the other day?  That is the last obstacle between us and the crankshaft.  Although the piece is cast iron, it has been wedged into an aluminum crankcase for decades, and beside being shrink fit into the crankcase, it also may have some corrosion between the two parts.  This is why you need a heat source to expand the aluminum to make it easier to pull out the main carrier.

First, take the two bolts you bought and thread them into the to holes in your bearing carrier.  DO NOT thread them all the way down or attempt to pull the carrier out without heat.  If you do, you will probably be experiencing extreme anger and frustration, as the carrier ear snaps off and the carrier remains steadfast in its hole.  Threading the bolts in now will prepare you for when the engine is up to temperature so you wont waste valuable time and expansion while searching for parts.

The last time I did this, I consulted the ABS’s engine manual which encouraged using an oven to expand the aluminum.  Not wanting to put anything Bantam in my oven, I spoke to a club member who suggested the idea of a space heater.  He recommended one of those radiant heaters,  however, they have gotten very hard to find.  I instead bought a stanley unit from Lowes.  Then I made a little heat corral of cardboard boxes surrounding the engine in the middle of my garage to ensure that as much heat as possible soaked into the engine before being stolen by my frigid garage.  This time, I had something better, a metal crate with wooden sides to corral the heat.  Either way, don’t get reckless, and please make sure that your heat corral is not on the verge of becoming a heat source itself.

This slideshow requires JavaScript.

Aiming the heater at the back of the engine and closing it in, I set my timer for 20 minutes.  Set to high heat and high fan, I began my wait.  As I said, keep your eyes on your set up.  Here is my observation station and view:

Once the first twenty minutes has passed, check to see how warm your crankcase feels.  More than likely, you’ll need to run the heater for at least another 20 minutes at full blast.  After 40 minutes, I turned off the heater as the aluminum was feeling quite warm and began to tighten the upper bolt.  Immediately, I was able to see the carrier pulling away from the top.

WP_20160109_016

You should only crank each bolt a little bit before moving to the next, hoping to remove this as evenly as possible.  The lower bolt however did not turn without a lot of resistance and the lower part of the carrier showed that it wasn’t ready to budge yet.  So I turned the heater on and set the timer for another 15 minutes.

WP_20160109_020

At the end of the 15 minutes, I tested the lower bolt and as it threaded deeper into the carrier I saw it separate from the block at the seam where they are joined.  Moving between the two bolts at even increments, the carrier came out very easily and exposed the crank entirely at the rear.

This slideshow requires JavaScript.

Reaching in through the bottom of the block with one hand, I carefully slid it out to my other hand.

This slideshow requires JavaScript.

Here is the bounty of our efforts:

WP_20160109_046

The next step is to take this crank and the connecting rods to the machine shop to see what I’m dealing with.  Although you can have the crank hot tanked, I’ve heard that you don’t want the rods hot tanked as it can adversely affect your babbit.  You should hand clean the rods with good detergents like brake parts cleaner, etc.

I will be taking this crank in and asking them to check it for cracks, straightness, and size of the journals.  I’ll also be asking them to check the rods for cracks and the size of the bearing material.  It’ll take a few days until I know for certain what the results are, but it’s always important to know that the most important parts in your engine are in good shape.  As the old adage goes, without a crank, there can be no Bantam engine.

Autopsy of an American Bantam Engine, Part I:

The odometer only shows 37,000 miles or so.  The frame looks like new.  The sheet metal isn’t even that beaten up.  So what happened to this car?

I had the chance to pick up some parts from an early 1938 coupe this weekend and with it was an engine.  I had known about this car when it had first hit craigslist and ebay about a year ago.  In the interim, a person bought it to build a hotrod from the body and was looking to sell the rest of the parts to make room for his project.

As you know, Bantam engines have a reputations for crankshaft problems, and I was thinking that with everything presenting as it was, perhaps crankshaft failure was the reason for this car’s premature parking.  Looking at the crank case, I saw it was obliterated, but wasn’t sure what else was wrong with the engine. I got the engine home to find the flywheel turned, but not all of the way around.  Even though it was late, disassembly began.

WP_20160103_015

Finally home and waiting for disassembly

As you can see, the entire back of the crank case is destroyed where the cast in bell housing meets up with the cast iron bellhousing adapter on the transmission.  Even more strange is that a large ring is entirely missing from the flywheel just aft of the ring gear.  Without this ring, there is no way to mount a Bantam clutch assembly to this engine.  If you look at the corner of the oil pan, you can look right into the engine.


This slideshow requires JavaScript.

With the pan opened up, the crankshaft became visible as did one of the reasons the engine wouldn’t turn.  The rod bolt for piston 4 was interfering with the bracket for the oil jet.  Also visible are signs of welding on the oil dippers integral with the caps and shims, possibly indicating a rebabbitted engine.

Further inspection shows that this engine had blown up at one point as there is a lot of damage to the crank case which has been welded up.  Presumptively, someone was hoping to bring this engine back to life, and forgot to tighten one screw all the way.  The flywheel that came with the engine was rubbing on the back of the block as a spacer was missing, but placing a different flywheel assembly on the rear alleviated that issue.  If you look, you can see the difference between a correct flywheel and one that has been heavily damaged.

This slideshow requires JavaScript.

Every aluminum part on this engine, except for the intake and carb are damaged.  There is no doubt that this engine had a hard life.  It’s actually amazing that the intake and carb have survived as they are most often broken off while all of the other pieces are fine.

In order to take the crankshaft out, which is the ultimate goal, I need to take quite a few parts off of the engine.  Taking the pistons out revealed a crankshaft with very nice looking journals and an odd assembly of rods.  This engine has two rods marked number 1 and no number 4.  Each rod has had a number of lines filed into the beam indicating which cylinder it corresponds to and attempts to cover up the original markings are present.  Two of the rods are part number:  A -3677 while the other two are A -3677 X which markings are quite different from the others.

This slideshow requires JavaScript.

The cylinder block looks quite nice upon closer inspection.  Here are a few miscellaneous photos highlighting the condition of this engine.

This slideshow requires JavaScript.

Although I was hopeful that this engine would have shown itself to be in better condition when I picked it up, all is not lost.  There are some really great parts on this engine that may either allow an entire other engine to be rebuilt (if the crank comes back good), or a bunch of parts that may help several other engines get back together.

The next installment will show the removal of the crankshaft and further disassembly.

Spring Is Here Early! Seriously, Austin and Bantam Springs are for sale.

A seller, calling the birth place of the Bantam home, has listed some essential parts for our little cars.  If you are putting a car together, you know you’d like to have some new springs that otherwise may seem like consumables.  This seller has throttle pedal return springs and clutch finger springs.  I will be placing my orders tonight if there are some left.  (save some for me)

Pedal return springs:
Note the seller has two spring variations reflecting the differences between Bantams and Austins

pedal springs
Click here to see the springs: American Austin – American Bantam throttle return springs Sold for: 18.00

Clutch springs:
clutch springs

Click below to see the seller’s offerings:

Set of 3 springs:  American Austin – American Bantam (set of 3) clutch finger springs “mousetrap” Sold for: 28.00

Single springs: American Austin – American Bantam ONE clutch finger springs “mousetrap” Sold for: 10.00