Building a Better Bantam: 1940 Badges

In this installment of Building a Better Bantam, I am giving an update on a project introduced this past December.  The project was a reproduction effort to recreate the hood side Bantam badges used on Series 65 and 66 cars.  The reasoning behind this effort was that these badges seemed to be generally unobtainable and originals, when found, were expensive and were even more costly to properly recondition.  Rather than just emulate the original, I wanted to go a few steps further and make them better than the originals while visually identical.  Why would I want to improve on the originals?  Take a look at this pair of photos:

After posting about reproducing 1940 Bantam hood side badges, there was a large outpouring of interest in the potential reproductions which has nearly accounted for the entire intended first run.  Interestingly, also after that post, rumors began to surface about there being a large cache of NOS badges someplace that were last seen at a meet decades ago.  Back then, they were under $10 each and came in their original paper wrappings.  While one of our endeavors in the past was temporarily thwarted by the existence of a large collection of similar NOS units in existence, this cache of emblems remained unaccounted for.

The month following the announcement here, an ad ran in one of the club magazines announcing that NOS emblems would be available from another supplier.  Alas, the collection emerged.  The ad indicated that they were available in creme, black, and red; some needing to be repainted.  Then, at the meet in Georgia, another collection of NOS badges appeared.  Both sellers were apparently asking around $45-50 per piece.

The debut of these parts appeared to obviate the need for my reproductions.  However, I was able to get some photos of one of these NOS badges which was still wrapped up in the original tissue paper from the factory.

1940 American Bantam Badge Reproduction NOS 1

Mummified for over a half century, I was very eager to see what was inside.  The anticipation was eating at me.  I couldn’t believe how many times the paper was wrapped around the badge.

1940 American Bantam Badge Reproduction NOS 2

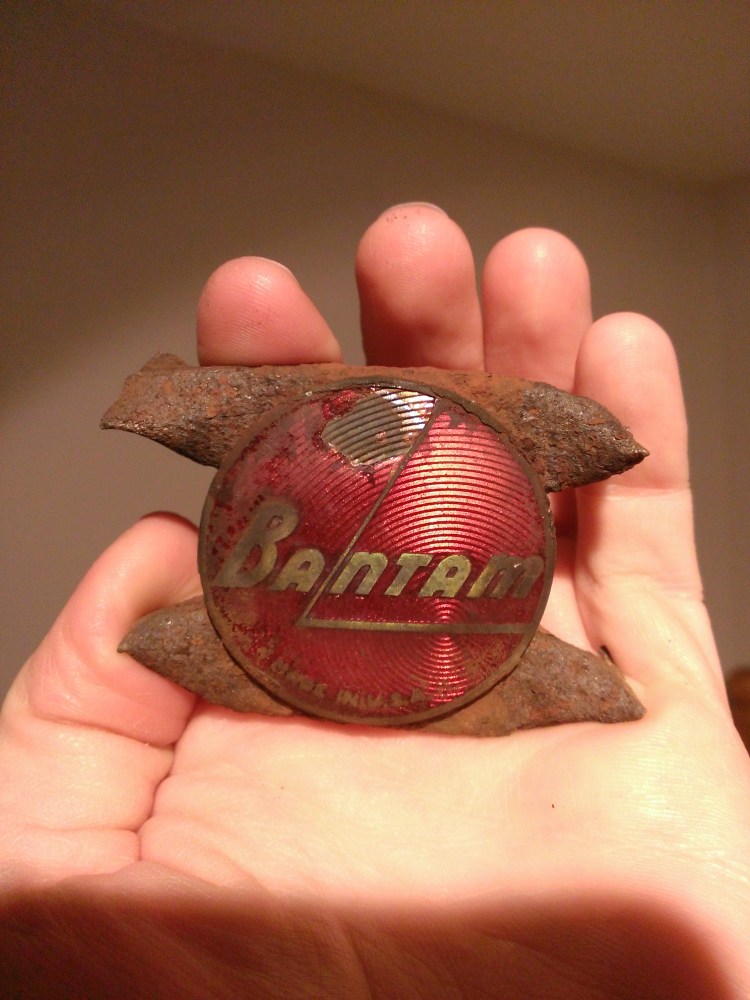
The threads on the rear pins looked fantastic.  I was very eager to see what beauty was lurking inside the yellowed paper.  So, I unfurled the paper the final turn and the face of the badge emerged.

1940 American Bantam Badge Reproduction NOS 3

What happened?  The chrome was cloudy and appeared to have rust coming through the surface.  Surely it was some sort of protective coating.  So I polished and attempted to clean it.  1940 American Bantam Badge Reproduction NOS 4

After those efforts, this is what I was left with.  A decent coat of creme paint, an unbent stamping, but mediocre chrome.  Surely this is great for someone who doesn’t have any badges or someone who has one similar to the lead images in this post.  However, to make this worth of being on the type of car you’re restoring, you would need to strip it entirely, rechrome it, and apply a fresh coat of paint.  While doing that, you’d need to be very careful of its ancient fragile structure.  This motivated me to keep progress moving on my effort.  About a month ago, a box arrived with my samples.  They were all too thin and needed to be re-engineered.  They looked great, but they weren’t correct.

This morning, this box came:

American Bantam Badge Deliver

Eagerly, I dug in to see what this round of samples looked like.  1940 American Bantam Badge Reproduction

That’s pretty snazzy looking in my mind.  It’s not an original or NOS part, but I was impressed with the finished product which the factory sent me.  This could look great on the side of our Sportsman project or the shop Hollywood.  You may be asking, how will this compare to an original.

The coat of red is very close to the original Bantam shade.  From the front, they are identical.  At the reverse, you can see what really sets the new badges apart from the originals.  These emblems are cast from a zinc alloy, allowing them to be rugged.  You should be able to bend them when installing them or dent them if you accidentally drop them.  They won’t crush if something gets pressed against them.  They also wont cut into the surface of your freshly applied coat of paint.  These are, in my mind, part of building a better Bantam.

For comparison sake, here is the creme sample at the bottom and far left of a line up with the smashed original, an original in need of chrome, an NOS unit.  I have a few tests I am looking to conduct on the samples before the final order is placed and the final pricing is announced.  I will be testing another chrome process and the addition of threads to the studs.  However, I will say the pricing will be very competitive with used and NOS units.  To make matters better, besides being available in creme, black, and red, they will also be available in bare chrome so you can paint them to match your car (as the factory intended).

If you’re interested in pre-ordering any badges to make sure you can have your order fulfilled in the first run, please use the contact form here:

Advertisement

Bad Luck Badge?

Perhaps it is good luck in a way that what happened, happened to me and not you.  As you may have learned from reading here on occasion, original Bantam emblems are not always easy to find in nice shape.  Original Bantam emblems are beautifully enameled pieces.  Small and sharp concentric rings lurk under a brilliant layer of translucent red.  Circling the red and accenting the branding are small glints of chrome.

More often then not, the chrome is pitted and the enamel is broken exposing oxidized copper based alloy.  I happened to get a nice one.  I don’t remember how, but I’m thankful for the fact that it is very passable and only needs minor work.  Two springs ago, I had the chance to find one attached to a very rough car.  The seller offered to sell me some parts and the badge came along for the ride.  It was interesting to see what the chrome plating was weathering into.  While I appreciated its patina, I also was interested in seeing if it could be fixed.  To get a badge refurbished properly, you need to be prepared to pay.

Here is the Bantam emblem the night I got it:wp_20150516_001

It actually came with pieces of grill bars as the seller felt it easier to remove that way.  You can see the tarnished metal, broken enamel, and general sad shape of this badge.

A few names came to the top in my search including one who had some other Bantam parts in his shop for chrome work and other restoration.  The man spoke of how he would restore the emblem.  He would need to use hydroflouric acid to remove the enamel, then fill in the background, fire the badge, and finally replate the branding.  He wanted $175 to do the job and asked me to send my emblem directly to him.  He sounded trust worthy, and I decided to send this badge to him.

While I was lucky enough to have a decent emblem, I foresaw a need to get an emblem refinished and figured that some friends in the club would need to get theirs done.  As this badge seemed to be shabby to me, I though I would send it out.  While I would be annoyed if it was stolen or done poorly, I wouldn’t be upended.

I sent the badge out to the man and didn’t hear from him.  I called to find out if he got it, he did.  Months passed and I called for another status update; he was unreachable.  For the better part of one and a half years, we played phone tag and I was inundated with excuses.  After a while, it doesn’t matter how valid one’s excuses are, they just don’t matter in the grand scheme of things.

I told him I was fed up with waiting and being fed one line after another; I only wanted my badge back so I could give another artisan a chance.  Suddenly, he said he had just fired the enamel and was waiting to see how it came out.  I asked for a photo.  Silence was the reply.

A few weeks passed and I asked him to just send the item, in what ever shape it was in.  He delayed in replying, finally saying it was done.  I asked for a photo.  He sent me a photo of a gorgeous emblem but said the studs broke off.  At first I replied with how happy I was, I asked for a photo of the back side and realized it was a gorgeous reproduction which sells new for $38.  I already had a reproduction, and they cost a heck of a lot less than $175. They also use screws that are fed into the back rather than studs which are fused onto the back of the emblem.

I told him I was through and wanted him to just send my part back to me.  He told me that it was in the hydroflouric acid, but he would send it as soon as he cleaned it up.  He sent me a photo of my emblem among a few others.  Yes, he was commissioned to do work for about 5 other people.  Each of them likely to be sent a reproduction emblem, told that their emblems had the studs broken off, or some such jazz.

Here is my emblem now, as it was shipped back to me:

thumbnail_wp_20161119_015

He sandblasted it, destroying every precious detail of the concentric rings.  Deleting the prominence of each line.  Making it so this badge could never be properly restored ever again.  The only thing that explains such a wanton disregard for the integrity of this emblem is spite.

I am not be publishing the man’s name or business here at this time, although I would love to.  While I am saddened that this emblem has been destroyed, I am happy that this spare emblem was destroyed rather than your nice one which only needed a little work.  Hopefully I can help you get your part to a person who will care for your part as if it were his or her own.  If you need your emblem restored, please send me a note and I’ll help get it into good hands.

One artisan is willing to take on the task of attempting to restore this emblem.  I will update you with the outcome.