Sportsman 4: Checking the Frame for Straightness

The chassis has found its new home in the shop, comfortably placed on a dolly and jack stands.  It doesn’t look too bad on the painted concrete floor, but it certainly shows signs of its age.  The first step in this project will be disassembling the chassis to strip it down to its most essential components.  As it sits, this chassis could be something you found in a chicken coop in Washington State, buried in mud in a Louisiana barn, or even under an original pickup truck in New York.

American Bantam Frame

Once the frame is stripped bare, you can begin to imagine all of the forms it may someday take on.  Will it the backbone of a stock restoration?  Will it hold together a special?  Perhaps it will be pushed to the limits keeping together a pepped up custom?  So long as it is still straight and strong, its possibilities are nearly unlimited.

Properly supporting American Bantam Frame

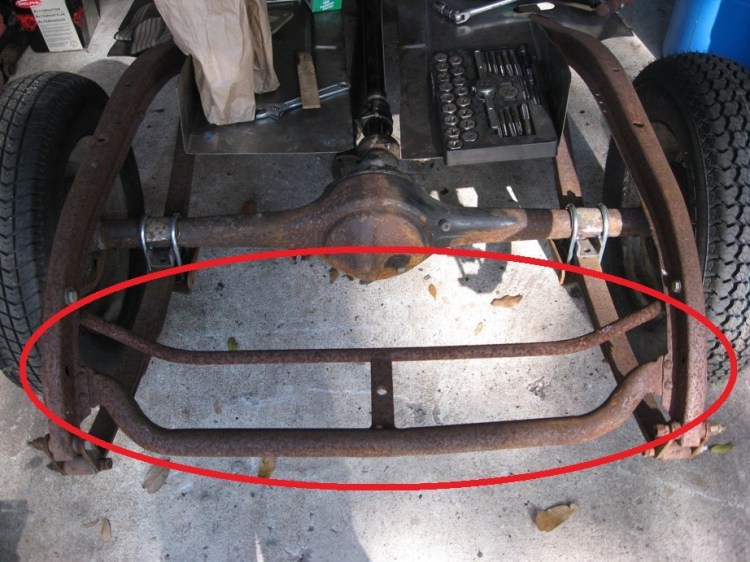
Whatever your dreams and plans may be, you need to make sure that you are not only starting with the correct foundation but, more importantly, a true one.  Bantam chassis consist of a forged front crossmember, two hat channel steel side rails, a central steel K member, and a rear crossmember of one of various configurations.  Like a model T, these frames were built to flex a bit.  They have little in common with the chassis of standard cars built during the same period.  These chassis are meant to have a bit of a spring to them which you can really sense if you put a foot on each frame rail near the center and put all of your weight on them.  It will undoubtedly bow in the center.  While this motion is normal, you should make sure that your rails are not buckled, twisted, or otherwise out of line.  You should also make sure that your frame doesn’t show any signs of rot or heavy pitting.  If the frame is damaged, you may want to consider finding another.  Frames are fairly plentiful and as this is the basis of the whole project, you are better off starting out with the best.

There are no published specifications indicating what a “straight” bantam frame should exhibit. The first endeavor was to mount the frame on four corners with the two at either end being level and the positions symmetrical from left to right.  Using some strong and straight wood provided for a flat mounting area so I wouldn’t have to worry about my frame slipping off of the jack stand grips to skew my measurements.

Remember, lifting this frame is not a hard feat, it’s probably 75 lbs at best.  However, be careful when lifting and shifting it.  You may need to adjust it a few times as you shim the jack stands or wood to level them out.  Once they are level, you can start inspecting and measuring your chassis.

Amazingly, three of the four mounting points were positioned well for leveling the frame. The front drivers side stand required a shim for which a small piece of junk mail filled the part quite well. Once I determined the wood itself was level, I placed the frame on it at similar points on each side. The frame made perfect contact at each point and the levels appeared to indicate relative trueness of the frame. I’m sure there are better ways to do this which would allow for more accurate results, but this seems to work.

Once it appeared there there was no twisting of the frame, I decided to see if the frame was pinched at all. Seeing the slight bends on the rear cross-member let me to believe there may be some issues in this regard. After realizing how hard it would be to do this with a standard tape measure and only one set of hands, I devised a better system.

First, I marked the frame with respect to fixed features found on each side using a heavy duty crayon. I marked off two measuring points on each side on the rear of the frame and one set of marks on the front. I then stretched out each of two very cheap harbor freight measuring tapes to hold them down to the frame using equally cheep harbor freight welding magnets. The magnets managed to hold the tape taut, but did pull a little bit when I exerted too much effort on the tape.

Both of the diagonally strung tapes measured up at the same distance which really began quieting my fears that this frame may be bent. Finally, I took my very precise Lowes ruler and suspended it across the frame where the tapes intersected. Sure enough, they intersected at the center of the span at that portion of the frame.

Not pictured was my determination that the frame was straight along its span.  Using a straight edge, I checked both hat channel side rails.  Both rails were flush with the straight edge until the point where the chassis sweeps upward.  Combining the straight edge test with the flush alignment of the chassis to the level wood helped me establish that the frame was in decent shape.

I’m sure I may have done better with factory measurements for the frame and a fancy frame jig, but I am very satisfied with the results. For all intents and purposes, this frame is straight.  After all of this, I am ready to begin transforming this bare chassis into the Bantam Sportsman project.

For this project you may need:

Tape measure

Two Thin Tape Measures, at least 10′ long

Click here to see the auction for the Tape Measure

Jack Stands

Four Jack Stands – these will come in handy for the entire project

Click here to see the auction for the Jack Stands

level straight edge

A straight edge / bubble level – Probably a good thing to always have for other projects.

Click here to see the auction for the Straight Edge / Level

Advertisement

Sportsman 3: Choosing the Right Foundation

To replace the many pieces of the shop project which were ravaged by the elements and pilfered over time, I had to quickly develop a careful eye toward Bantam parts.  I learned early on that it is very easy to waste money and time on incorrect parts.  The series on the build for the Sportsman is not only an advertisement for our locating and parts services, but also serves as a primer to help you with your project.  If you don’t have a project yet, hopefully this will inspire you to take one on and arm you with information necessary to avoid common pitfalls.

Considering that many of the production changes of the American Austin and Bantam cars were more evolutionary than revolutionary, you may not have expected there to be a large divergence between the underpinnings of each car.  While the chassis of each sort of car should fit under the other, they are all very distinct and each have their own eccentricities of which you need to be mindful.

American Austins, of all shapes and sizes, used one style of frame.  The Austin frame was essentially a v-shaped unit, with no connection at the rear end of the car.  If you’re building an American Austin, your chassis selection is pretty simple.  If you are hoping to underpin your American Austin with a Bantam Chassis for added support and driveline flexibility, you should continue reading.

Austin frame

An American Austin chassis fitted with some Bantam parts.  Note the parallel central crossmembers which are joined by a perpendicular piece with numerous holes along its length.  Also, note the terminal ends of the chassis, they are straight once they get to the center-line of the rear axle.  They are also not connected by anything other than the rear bumper on some models and a thin bracket and bumper on others.

When production resumed as American Bantam, the new cars found themselves equipped with a new frame.  This new frame looked identical to the Austin up until the forward transverse crossmember.  A pair of members now extended from that forward central crossmember to two partial members extending out of the frame just before its upward flare near the rear wheels.  This pair of members formed a V shape and allowed Bantam to switch from a torque tube based drive line to a more modern drive shaft.

1940 Bantam Coupe Frame - center cross members


At the rear of the chassis, Bantam used at least three different styles of rear crossmembers which were used for different cars.  Roadsters and coupes had the two rear frame rails unified by a length of thin c-channel in earlier years.  In the final year of production, that thin c channel was replaced with a heavier c channel with a shallower c-shape.  Bantam commercial cars utilized a tubular rear crossmember which also served as a spare tire carrier.  This rear member consisted of two tubes connected by a flat piece of steel.  Bantam four passenger convertibles utilized the larger tubular member from the commercial frames, but forwent the smaller tube, prohibiting the crossmember from serving as a spare tire mount so as to clear the unique floor for accommodating rear passengers.

bantam rear xmember

Here is a photo of a Commercial Style rear cross member.  For a four passenger convertible, the chassis only utilized the larger tubular member and deleted the reset of the components.


For series 65 Bantams equipped with the three main engine, these cars featured a new drive train mounting method which also included a new means of attaching the radius rods.  As such 1940 frames have cast brackets riveted into the corners created by the full transverse crossmember and the frame rails which are absent on all earlier models.  The 1940 also has a ball style socket for the radius rods to couple onto providing for a greater freedom of motion for the rods as compared with the earlier style mount.


1940 vehicles equipped with hydraulic shock absorbers, primarily passenger cars, had a pair of cast brackets riveted to the frame in the rear above where the axle would ride and had a pair of bent steel front mounts riveted where the forged front cross member meets the frame rails.  These should not be mounted on other frames, unless the vehicle was equipped with dealer added shock abosorbers (I’m still hoping to learn more about cars with added shocks).

1940 Bantams also had an extra pair of floor supports located on the V shaped frame members.  These brackets were not available previously.

1940 floor brackets

The next difference between a 1940 frame and earlier style frames is the manner in which the central transverse crossmember is clearanced for the exhaust system.  For a 1940 Bantam with a three main bearing engine, your chassis should look like the photo on the left.  For any other Bantam, your chassis should merely have a hole cut through the crossmember.  This hole will likely be larger than the hole on the driver side of the chassis.


The final difference between the frames revolves around the parking brake assembly attached to the chassis.  The earliest Bantams featured a hand brake on the passenger side of the transmission which protrudes from the floor and is pulled back to engage the brake.  This assembly requires a mounting bracket attached to the transverse crossmember.  It also requires that the transverse brake actuation bar has a pinned member which can be actuated by the pulling of the lever.  This pinned member will be located the passenger side of the bar, between the center line of the frame and the frame rail.  I will have to find some photos of this set up and add them here later.

In 1939, Bantam introduced a new brake assembly which was also floor mounted, but was located under the drivers legs and pulled up.  This assembly featured a bracket which would support the floor riveted to one of the members making up the v shaped crossmember.  This set up also included a cast or forged lever through which the brake actuation bar passes at one end and can be moved by the raising and lowering of the brake handle.  The lever rides free on the actuation bar and pushes against a pinned member when the brake is engaged.

The final variation arrived at some point for 1940 cars.  At this point, the brake bar was endowed with a second pinned lever identical to the standard pinned lever which the brake pedal actuated.  These levers should be fairly close to each other.  This added lever was actuated by an adjustable link attached to a pivoting bar pinned to the chassis.  The pivoting bar was moved by a brake cable which ran into the passenger compartment to a parking brake handle mounted to the underside of the dashboard.  To limit unwanted motion, the cable was fixed at one end to in cabin assembly and to the chassis by a brake cable retention bracket similar to those used elsewhere of the chassis.

1940 brake setup chassis bantam

As you can see, Bantam chassis are not very interchangeable despite a similar appearance.  You can take one chassis and likely modify it to accommodate your required functionality, but please be aware that such a procedure is very time consuming.  There are a lot of bare frames out there waiting for love, you are likely best off taking a bit of time to scour the available parts for just the chassis you need rather than modifying an original chassis.  As you follow along with this project, you’ll see that I have learned this lesson the hard way.

If you are seeking a four passenger or commercial chassis, you may need to consider modifying a standard chassis for the correct model Bantam and acquiring a tubular rear cross member assembly.  As a warning, original tubular rear cross members are difficult to find in decent shape, however we can now supply you with fantastic reproductions.


Sportsman 2: Thank you Mr. Tremulis

A lot of you may have cringed previously when seeing my previous post, introducing the Sportsman: our shop project.  Here is part 1.  That reaction was mostly based upon the condition of the body which will form the basis of this project.  While I can wax on about the work that needs to take place in order to get these bits of scrap rolling again, a bit of a story is necessary.

Without delving too deep into Bantam facts and lore, here is the most important part of Bantam history, maybe an exaggeration, besides that whole Jeep thing. Before the Bantam’s exit from civilian car production, Roy Evans, the president of the American Bantam Car company found himself in California. Driving a Bantam roadster around, he wished the car was a little more weatherproof. Seeking better side curtains, he asked around until he was recommended to the right man for the job. That man was Alex Tremulis.

alex tremulis

Alex Tremulis

Rather than trying to seal the roadster, Tremulis pitched the idea of an all-weather cabriolet.  Evans took to the idea, promising Tremulis a small allotment of money and a standard Bantam donor coupe. Afraid of Evans changing his mind, Tremulis immediately cut the roof off of the coupe so there was no going back. Sure enough, the president tried to change his mind, to only find the car beyond the point of return. With that, Tremulis set to work on what would become the Hollywood, a great Bantam. The visionary designer knew he was designing something special on a shoe string budget.

After taking a little off the top, reshaping the doors, and recycling sections of a REO Royal into a bustle; the coupe was transformed into a Hollywood. Capable hands made short work of the project and the car was a fully functioning convertible. The front sheet metal was standard Bantam issue, but from the windshield back every panel was modified. In the end, it was part tasteful custom and part prototype.


With Evans satisfied with the way the car was turning out, Tremulis wound up with the prototype Hillmaster engine which was new for 1940. The engine boasted 3 main bearings and overall better performance, than its two main bearing predecessor.  The engine built upon Harry Miller’s earlier improvements to the American Austin engine again squeezing out nearly 25 percent more power.

As part of the deal to design the car, Tremulis had to deliver the car from his shop in California to the Bantam factory in Butler, Pennsylvania where he had earned a position as the in house designer.  Making it to Butler in record time, some changes were made to the little cabriolet’s design before putting it into production.  While in Butler, Alex also turned his hand to designing the Bantam Riviera, a 4 place convertible sedan.  In total, over 150 of the convertible coupes were built. Out of the passenger cars built for 1940, a large number of them were the redesigned Tremulis models.

bantam super 4 poster

The new Super-4 models, both penned by Alex Tremulis.

You’ve seen some of my “surviving” bits of one of these Tremulis styled Bantams.  The Sportsman project will draw upon Alex Tremulis’ concept, the lines of his elegant drawings and the spirit of the car he hand crafted.  It will also take the model name of the Supercharged Cord 812 which some attribute to Tremulis.  However, there will be some departures from the original Bantam Hollywood body along the way; including constructing and skinning the body in wood similar to the post-war Ford Sportsman.

More to come!


The Shop Project: Sportsman I

Perhaps I’ve introduced this project before, but I can’t find the post.  So, in the case I’m repeating myself, I’m going to try to spice this story up for you and present it from a new direction.

This story begins in 2013, when I had tried, to no avail, to buy several different Bantam Hollywoods and Convertible Coupes.  At that point, this website didn’t exist and a person interested in a Bantam was not faced with the paradox of choice you have today.  What did exist was the ability to pursue leads in a scattershot approach with the hopes that something great would turn up exactly when you were looking.

One night, using my scattershot approach, I found a craigslist ad in Tehachapi which piqued my interest.  Now, if you didn’t already know, Tehachapi is in California; a place I have never been.  For us on the east coast, California is known as a haven where all of the antique cars are rust free.

The ad described a hoard of fantastic proportions, at least with relation to the market of the time.  There were a few photos of the whole collection and just one illustrating the gem of the collection, remnants of a 1940 Bantam.  The car had been picked clean over the years and had undoubtedly given life to many other Bantams.  Yet, there was something about it that made me think it needed to make the journey to New York.  Thoughts of turning it into the car of my dreams ran through my head, without knowing exactly what those dreams were.  Seeing the body, I knew it could be a blank slate of sorts.  One where I could exercise some creativity without destroying something likely to be restored.  I could try to break the mold a bit with this one.

By the time the plans for the body began to materialize in my mind, the lot was spoken for, but thankfully the buyer and I were able to get in touch with each other.

Here is a photo from the ad:

thumbnail_2013-10-27 11.13.40

Here is the body emptied out:

Remants of a 1940 Bantam

An original California car.


Here is a front view:

front view

Front view of the 1940 Bantam

As you can see, it is a bit rough and you may thinking it is more of the stuff of nightmares than dreams.  However, this body isn’t all that bad for what I am planning.  Stick around for more updates and learn about its trip across the country to its new home.

As a disclaimer, my mechanical, sheet metal, and woodworking skills are fairly weak.  This will be a learning experience and will hopefully give others the courage to adopt a project in need of a lot of love.