Let’s make a shopping list

Certain Bantam and Austin parts are exceedingly rare.  There are a lot of times that we go to car shows with great flea markets, but end up passing over items that we either don’t need or don’t recognize.  What that means is that there are a some great parts slipping through our fingers at car shows which we could all be helping to preserve.  Maybe you don’t need the part, but if you can get it for the right price, we can try to get it to a good home.

Some people have come up with lists of certain Bantam goodies, however, those lists aren’t widely circulated.  Please join me in creating the ultimate shopping list for a Bantam or Austin enthusiast to make sure that the parts our cars need to keep running don’t end up in landfills.

Using the “Contact Us” tab, please feel free to begin sending in photos and information.  I hope this helps!

A couple of neat finds for Wednesday

American Austin or Bantam Roadster Connecting Roadster Side Curtains

Click here to see the listing: AMERICAN AUSTIN / BANTAM AUTOMOBILE / CAR SIDE CURTAINS FOR ROADSTER $224.72


American Bantam NOS connecting rods

bantam con rods

Click here to see the listing: American Bantam connecting rod sets of 4 – 1938-1939 $45 (6 sets sold!)


American Austin or Bantam Clutch Disks

clutch disks

Click here to see the listing: Clutch discs for American Austin -American Bantam – English Austin 7

Weekend Special!

The owner of a lovely 1938 Bantam coupe advertising on this website asked me to drop the car to a new for 2016 price.  From what I’ve heard, it’s a gorgeous car that will make any owner proud.  Click on the photo below to see this stunning car in all of it’s lowered price glory:


150

Autopsy of an American Bantam Engine: Part IV

The results are back from the machine shop, the crank is good!

WP_20160113_002

Results:

Main Journals:  Standard 2.5″  This engine:  2.454-2.452″ Undersized at:  .048″

Rod Journals:  Standard 1.312″ This engine:  1.290-1.289″   Undersized at:  .023″

Magged: OKAY

Straightness:  OKAY

The man at the machine shop recommended a polishing of the journals at most, but said the rod journals looked nice.


WP_20160113_003

Ziploc makes great bags for your crank shafts awaiting their destiny.  Just oil up the crank, place it inside, push out the air and lock it in.  You could get a little extra fancy and add one of those silica packets from a shoe box until you know exactly what you’re doing.

As for this crankshaft, I’m not quite sure what I’m going to do with it just yet.  All of the other pieces that make up the engine are inside of a large plastic bin in my garage.  So, which ever way I end up going, I at least know that this crank is supposed to be a good foundation for an engine.  Whether I gather up replacement parts to fix the cracked pieces on this one, or use it as the basis for another engine, it’ll be nice to know that the piece holding it all together is straight and strong.

After everything, I am thinking that this engine was fully rebuilt at one time and the person who did the work was very angry when the engine wouldn’t turn over all of the work.  The owner may have let it sit for a while, trying to decide what course would be best to take and finally decided to get rid of the car.  Wanting to make sure that no one could use the car easily again, the person may have taken a hammer and destroyed the parts he knew would cause this car to be out of commission indefinitely.  With the crankcase destroyed and the bell housing smashed, just sliding new parts in would have been difficult.  Destroying the gas tank with what looks to be a pick axe may have also been part of an angry seller’s plan.

Either way,  there are enough empty crank cases out there awaiting a nice crank like this, and enough cars waiting for a good engine.  The car this came from is being hot rodded by a father and son who are looking to do it properly.  So, the car is finally getting a new lease on life, and its parts may do the same for another Bantam or two out there.

Thanks for reading.


Autopsy of an American Bantam Engine: Part III

Welcome to the final installment of the disassembly.  Could the engine come apart a little more?  Yes.  In fact, the oiling system will probably need to be taken out of this engine, but everything is at a stand still until I know what condition the crankshaft and rods are in.

Remember that rear main bearing carrier I showed you a photo of the other day?  That is the last obstacle between us and the crankshaft.  Although the piece is cast iron, it has been wedged into an aluminum crankcase for decades, and beside being shrink fit into the crankcase, it also may have some corrosion between the two parts.  This is why you need a heat source to expand the aluminum to make it easier to pull out the main carrier.

First, take the two bolts you bought and thread them into the to holes in your bearing carrier.  DO NOT thread them all the way down or attempt to pull the carrier out without heat.  If you do, you will probably be experiencing extreme anger and frustration, as the carrier ear snaps off and the carrier remains steadfast in its hole.  Threading the bolts in now will prepare you for when the engine is up to temperature so you wont waste valuable time and expansion while searching for parts.

The last time I did this, I consulted the ABS’s engine manual which encouraged using an oven to expand the aluminum.  Not wanting to put anything Bantam in my oven, I spoke to a club member who suggested the idea of a space heater.  He recommended one of those radiant heaters,  however, they have gotten very hard to find.  I instead bought a stanley unit from Lowes.  Then I made a little heat corral of cardboard boxes surrounding the engine in the middle of my garage to ensure that as much heat as possible soaked into the engine before being stolen by my frigid garage.  This time, I had something better, a metal crate with wooden sides to corral the heat.  Either way, don’t get reckless, and please make sure that your heat corral is not on the verge of becoming a heat source itself.

This slideshow requires JavaScript.

Aiming the heater at the back of the engine and closing it in, I set my timer for 20 minutes.  Set to high heat and high fan, I began my wait.  As I said, keep your eyes on your set up.  Here is my observation station and view:

Once the first twenty minutes has passed, check to see how warm your crankcase feels.  More than likely, you’ll need to run the heater for at least another 20 minutes at full blast.  After 40 minutes, I turned off the heater as the aluminum was feeling quite warm and began to tighten the upper bolt.  Immediately, I was able to see the carrier pulling away from the top.

WP_20160109_016

You should only crank each bolt a little bit before moving to the next, hoping to remove this as evenly as possible.  The lower bolt however did not turn without a lot of resistance and the lower part of the carrier showed that it wasn’t ready to budge yet.  So I turned the heater on and set the timer for another 15 minutes.

WP_20160109_020

At the end of the 15 minutes, I tested the lower bolt and as it threaded deeper into the carrier I saw it separate from the block at the seam where they are joined.  Moving between the two bolts at even increments, the carrier came out very easily and exposed the crank entirely at the rear.

This slideshow requires JavaScript.

Reaching in through the bottom of the block with one hand, I carefully slid it out to my other hand.

This slideshow requires JavaScript.

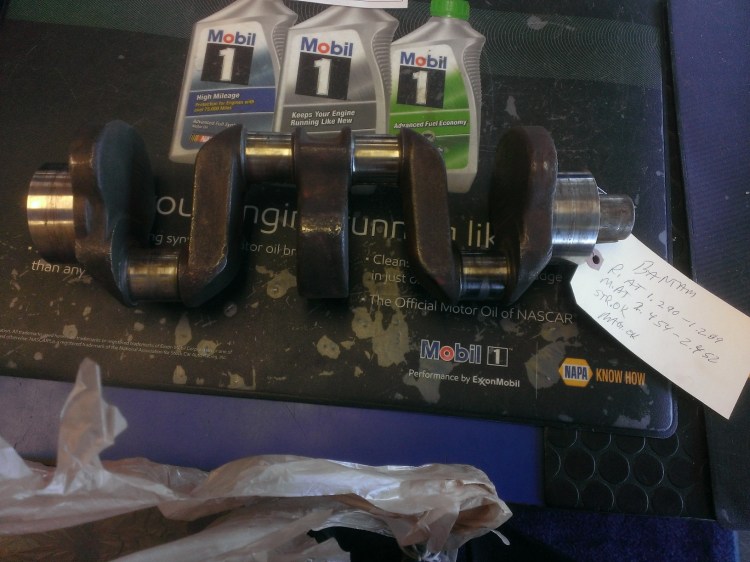
Here is the bounty of our efforts:

WP_20160109_046

The next step is to take this crank and the connecting rods to the machine shop to see what I’m dealing with.  Although you can have the crank hot tanked, I’ve heard that you don’t want the rods hot tanked as it can adversely affect your babbit.  You should hand clean the rods with good detergents like brake parts cleaner, etc.

I will be taking this crank in and asking them to check it for cracks, straightness, and size of the journals.  I’ll also be asking them to check the rods for cracks and the size of the bearing material.  It’ll take a few days until I know for certain what the results are, but it’s always important to know that the most important parts in your engine are in good shape.  As the old adage goes, without a crank, there can be no Bantam engine.

Autopsy of an American Bantam Engine, Part II

This is the second installment in the tear down procedure.  I left off with needing pullers to get the rest of the engine ready in order for me to pull the crank out.

If you do not have a three jaw puller, you can usually borrow them from Autozone or Advanced Auto Parts.  They charge you the full price of the tool, and refund it upon return.  It’s a great service, however the tools are generally about the same quality you would find at a Harbor Freight.  So, if you decide you’re in love with the tool or it is something you will need repeatedly, it would be cheaper to buy it almost anywhere else than to keep the one from the auto parts store.

WP_20160108_001

I left off with the crank pulley still attached to the crank.  Since the cover behind it is aluminum, there is no way I want to pry against it, even though it’s already broken.  The piece that is broken is very repairable.  The pulley however, is already broken, with a large chip out of it.  I believe they make special pulley pullers, but I didn’t really think about it at the time I was renting this one.

Keeping the crank engagement bolt in place, I attached the puller as you can see below.  When you do this, make sure to thread the bolt into the crank so you don’t foul up the threads, but leave room so you have where to move the pulley.  Removing the washer will help.  If you don’t provide ample room, you may not realize that the pulley is infact moving, but you are just pulling against the bolt.  This will result in breaking the cast pulley even more.  I’ll let you guess how I found that one out.

This slideshow requires JavaScript.

The pulley is kept in place with a key, but it pulls off nicely.  Once it is off, removing the perimeter bolts of the cover allow it to free itself and you are then faced with the next challenge, the timing gears.  At first glance, it looks as though the right way to do this is to remove the nut from the cam to take those gears off.  This nut has been marred in an effort to keep the assembly attached.  Attempting to take the nut off ended up yielding the entire cam assembly.  This is okay for me for now.

The last challenge on the front end of the crank case is the timing gear attached to the front of the crank.  The puller and the crank engagement bolt will come in handy here.  Make sure you have the jaws engaged so you don’t damage the teeth.  (This one I didn’t learn the hard way).  You may want to soak this in your favorite penetrating fluid.  Now all of the front end impediments to pulling the crankshaft out have been dealt with.  If you look carefully, you can see more damage to this crank case, the lower two bolt holes are broken.

This slideshow requires JavaScript.

The next challenge will be dealt with tomorrow.  This final step in pulling the crank out is by far the most important.  Once you pull off the flywheel, you will see 6 fasteners holding in the rear bearing carrier.  You will also see two holes that have nothing in them.  These holes are threaded and are going to be very important in getting the crank out.

This slideshow requires JavaScript.

For part three, make sure you have two bolts that thread into those holes that are over an inch long and a space heater.  In part III, you see what to do with them.  Don’t touch your engine until you read the rest.

Also, this is the perfect time to say, if you haven’t joined the clubs, DO IT.  If you’re not interested in the club scene or the great people you’ll meet, at least do it for the tech information. The Austin Bantam society has a wonderful CD indexing all of the tech articles that both clubs have put out during their existence.  Among those articles is most of a great engine rebuilding manual.  The guidance of that manual and the club members have helped me greatly in this process.

Remember, when it comes to Bantam parts; don’t break them, please.


Autopsy of an American Bantam Engine, Part I:

The odometer only shows 37,000 miles or so.  The frame looks like new.  The sheet metal isn’t even that beaten up.  So what happened to this car?

I had the chance to pick up some parts from an early 1938 coupe this weekend and with it was an engine.  I had known about this car when it had first hit craigslist and ebay about a year ago.  In the interim, a person bought it to build a hotrod from the body and was looking to sell the rest of the parts to make room for his project.

As you know, Bantam engines have a reputations for crankshaft problems, and I was thinking that with everything presenting as it was, perhaps crankshaft failure was the reason for this car’s premature parking.  Looking at the crank case, I saw it was obliterated, but wasn’t sure what else was wrong with the engine. I got the engine home to find the flywheel turned, but not all of the way around.  Even though it was late, disassembly began.

WP_20160103_015

Finally home and waiting for disassembly

As you can see, the entire back of the crank case is destroyed where the cast in bell housing meets up with the cast iron bellhousing adapter on the transmission.  Even more strange is that a large ring is entirely missing from the flywheel just aft of the ring gear.  Without this ring, there is no way to mount a Bantam clutch assembly to this engine.  If you look at the corner of the oil pan, you can look right into the engine.


This slideshow requires JavaScript.

With the pan opened up, the crankshaft became visible as did one of the reasons the engine wouldn’t turn.  The rod bolt for piston 4 was interfering with the bracket for the oil jet.  Also visible are signs of welding on the oil dippers integral with the caps and shims, possibly indicating a rebabbitted engine.

Further inspection shows that this engine had blown up at one point as there is a lot of damage to the crank case which has been welded up.  Presumptively, someone was hoping to bring this engine back to life, and forgot to tighten one screw all the way.  The flywheel that came with the engine was rubbing on the back of the block as a spacer was missing, but placing a different flywheel assembly on the rear alleviated that issue.  If you look, you can see the difference between a correct flywheel and one that has been heavily damaged.

This slideshow requires JavaScript.

Every aluminum part on this engine, except for the intake and carb are damaged.  There is no doubt that this engine had a hard life.  It’s actually amazing that the intake and carb have survived as they are most often broken off while all of the other pieces are fine.

In order to take the crankshaft out, which is the ultimate goal, I need to take quite a few parts off of the engine.  Taking the pistons out revealed a crankshaft with very nice looking journals and an odd assembly of rods.  This engine has two rods marked number 1 and no number 4.  Each rod has had a number of lines filed into the beam indicating which cylinder it corresponds to and attempts to cover up the original markings are present.  Two of the rods are part number:  A -3677 while the other two are A -3677 X which markings are quite different from the others.

This slideshow requires JavaScript.

The cylinder block looks quite nice upon closer inspection.  Here are a few miscellaneous photos highlighting the condition of this engine.

This slideshow requires JavaScript.

Although I was hopeful that this engine would have shown itself to be in better condition when I picked it up, all is not lost.  There are some really great parts on this engine that may either allow an entire other engine to be rebuilt (if the crank comes back good), or a bunch of parts that may help several other engines get back together.

The next installment will show the removal of the crankshaft and further disassembly.

T-5 items to start your year off right


1969-1970 Ford T5 Mustang Export Owners Manual German Bedienungsanleitung Deutsch 1969/70


If you have a T-5, there is a good chance you don’t have one of these.  These original Bedienungsanleitungs are very difficult to find.  Mine took 5 years of looking, a year of discussions, and finally getting it from a collector in the Netherlands.  I’m still very grateful he was willing to let go of it.


Click here to see the listing: Ford T5 Mustang Export Owners Manual German Bedienungsanleitung Deutsch 1969/70


1967-1978 T-5 Emblem Inserts

These are the pieces that you ad into reproduction GT emblems (somehow) to make complete T-5 emblems for your car.  This seller has a few of these from time to time, but who knows how long they will be available.

Click here to see the listing: GERMAN MUSTANG NOS T5 EMBLEM INSERTS GENUINE FORD